

Well here it is!
The Bird is a Clown :)
Good guess, Kristi!

Look at that face...

She was pretty curious about that red nose

And that hat?
She seriously couldn't get any cuter...

Would you like to learn how?
Here's the tutorial...
(click on the "read more" button)
I tried to be really detailed so there are a lot of pictures.
Who knew a clown costume would have so many steps?
Supplies for 18-24mos costume
(I bought everything at Walmart.)
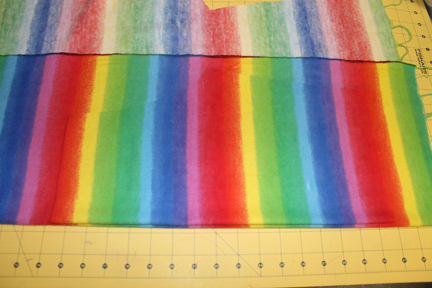
1.5yd Rainbow Flannel ($2.50 a yd on sale!)
Grosgrain ribbon (stash)
Five-1/2 yd cuts of glittery fun fabric for the tutu (average 2.25yd)
Several cuts of elastic for waist bands (stash)
30inx12in red fabric for neck ruffle(stash)
two-30in cuts of ribbon (stash)
craft puffy balls (stash)
spare cardboard for hat
scraps for hat embellishments
coordinating thread
snaps and a snap kit
If you're kiddo is a different size, spend some time with a tape measure.
Personally I always over-buy supplies so I don't run out.
snaps and a snap kit
If you're kiddo is a different size, spend some time with a tape measure.
Personally I always over-buy supplies so I don't run out.
First, make the pattern.
Never done this before?
It's okay. You're brave and you.can.do.it!
Grab some jammies that fit your kiddo and some butcher paper
Trace! Give yourself 1/4 to 1/2 inch seam allowance

Tuck the arms in to get the right shape

Cut out the pattern!
Fold the top piece in half to make sure it's symmetrical
 | |||
Cut two of these...

Fold one in half and make a nice cut.

See? Front...

Back...

Pants!

To make the sleeve pattern, grab one of the top pieces. Doesn't matter which

Trace the armhole

Trace the sleeve. Make sure to angle the wrist.

It should look roughly like this.

Cut!

Now you have the pattern pieces!
See? I knew you could do it.
You're so brave
Now's the time to cut the fabric
Okay, stripes can be tricky.
Fold the fabric.
Make sure the stripes are lined up.
Line the straight edge of your pants piece with the fold.

Trace and cut!

Lay the folded pants piece down.
Make sure the fabric is folded and lined up.

Lined up!
You should have two folded pieces like this.
See how the stripes line up?

Now for the top.
Grab the back piece

Make sure it's even.
See the corners of the shoulder and neck?
They both hit the same place.

And trace the front. And cut.

Trace the sleeve, on the fold just like the pants. Cut sleeves.
Woot!
Let's build some pants.
Unfold the pants pieces.
Place them right sides together.
Pin the curves.
Sew both curves.

It'll look like this.

Bring the end of the seams together.

Now it looks like this.

Pin the inside of the leg pieces.
And sew.

Fold the top down and press.
This is for the waist band.

Create the top hem any way you'd like.
But let me show you how I sew a hem.
Seen one of these before?
It's called a hemmer.
At least that's what I call it
It makes a really nice narrow rolled hem.
It saves so much time.
Here's a few tricks if you've never tried it before.

First, cut out a small piece of paper towel.
Small.

Sew a simple seam to attach to the right side of the fabric.

It should look like this now...

Thread the hem through the twirly looking thing.

Pull gently, feeding the hem in until you hit the paper towel.
Once you hit the paper towel, start your seam.
As you continue the hem, keep feeding the fabric threading through the swirly part.

Once you get all the way around, leave an opening.

Grab your elastic...

... and thread it through the waist band.

Sew the ends together.

Pin the opening closed and sew.

Hem the legs...

You have pants!

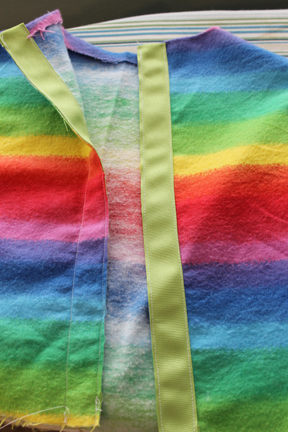
Now for the top.
Pin and sew the shoulders right side together.

Pin and sew the sides.

Should look like this.
Don't sew the bottom or the armholes.

Fold and sew a hem around the neck.
(you can use the hemmer foot!)

Cut open the back.
Make sure it's straight

Lay some grosgrain ribbon along the outside edge and inside edge.
Sew

It should look like this.
Sleeves!
Fold sleeve right sides together and pin like this:

Sew.
See the seam?

Slip the sleeve into the arm hole.
Right sides together.

Now turn to the inside and pin.
Sew.
Repeat for the other sleeve.

Okay. Flip that shirt over and get ready for some
snappin' action
get yourself a kit at Walmart.
I keep all my pieces in a jar.

Mark where you want the snaps.

You'll need these four pieces to make one complete snap.

Place the pieces in the snap holder thing

Sandwich your shirt with the snap contraption.

Find something heavy.
You can use a hammer.
I use the carved wood tiki lookin' dude my hubby got me from Hawaii when we were engaged.

Slam it down on the snap sandwich a few times.
Bang!

Bam!

Do it again on the other side...

OOhhhh Snap!
(it had to be said)

Tada!
Don't forget to hem the bottom.

Snag that first tutu fabric piece and sew the selvage edges together.

Hem the edges.
This was tricky for me. Slippery fabric!
My hems are pretty messy but I think it adds to the goofiness of a clown.
(this isn't a prom dress!)

Do this to all of the tutu pieces.
Look how fun that is??

Okay, now put all the fabric together like this:

It's kind of confusing looking but they are all layered inside each other.
You should have 10 layers. Make sure they are NOT just laying on top of each other.
You want them to be wrapped around.
Lift up the first 5 layers with one hand

Then slip your other hand through and grab.

And pull that side through...

It should all look like this:

and this...

Pin around the top edge. This is where the waistband will be

Sew about 1.5 inches in from the edge all the way around

But leave a gap. It's hard to see but there is a break in the seam.

Flip up the first half of the layers, looking for that opening!
That's where you thread the elastic through to create the waist band.
This works the same way as the pants did. Refer back if you need help.
This works the same way as the pants did. Refer back if you need help.

Tada!

But when I tried this on The Bird, it was way too long.
So back to the sewing machine for a large hem on each layer...

And now,
Tada!
I like it this way much better. The larger hem makes the skirt even more flouncy.
The Tutu is done!

Move on to that neck ruffle...
Grab that 30x12in red fabric.
Sew selvage edges together.

Slap a narrow hem on the bottom and a wider hem on the top

Leave a gap on the top hem for the elastic.

Pin on your first ribbon.
Zig-Zag stitch it on.

Pin the next ribbon...

And Zig-Zag that one on.

Thread your elastic through, just like the pants and the tutu waist bands and finish it off with a nice seam.

Lay that ruffle on top of the shirt and hand sew some craft fluffly balls on.

On to the hat!
I started with this stencil
but made it a little smaller.
I just eye-balled it.

Trace it on some cardboard, don't forget the line for the crease

Cut!!
After you cut, crease on the line you remembered to draw.
Then start rolling it up to shape it into a hat.

Grab a scrap piece of fabric
lay the brown side of the cardboard onto the wrong side of the fabric

Hot glue the fabric to the hat, pulling tightly on the edges

Flip that puppy over

Apply more hot glue to the flap you creased.
You'll be able to feel it beneath the fabric.
Pinch your hat together
Use lots of glue.

Saweet!

Embellish!

Cut a piece of elastic
(measure your kiddo from the top of the ear, under the chin, back to the other ear)
Apply hot glue to the insides of the hat, creating a neck strap.

Results:

Now, go eat some chocolate.
You deserve it after all that hard work!
Wow Michelle, TRULY IMPRESSED!!! I think I might just go and eat some chocolate now just because I feel like I learned so much by simply reading this post:)
ReplyDeleteJuli
amazing. truly i have the most talented friend! holy cow, i still can't believe that you did all of that!
ReplyDeleteThank you thank you. She is an adorable clown fo shure!! I CANNOT believe you made all that! No, wait. I totally can. I just cannot believe you pulled that off and managed a home, meals, and TWO kids!!! You are super mom and my sewing idol. Which is pretty much as cool as American Idol!!
ReplyDeleteSo fun! You are truly amazing. I love the cute costumes and fun tutorials. You make it seem so easy. Love you!
ReplyDelete